Every aspiring DIY enthusiast or seasoned craftsperson knows the value of a dedicated workspace. A sturdy workbench isn’t just a luxury; it’s the heart of any productive garage or workshop, providing a stable surface for projects big and small. While countless options exist on the market, building your own DIY wood workbench offers unparalleled satisfaction, cost savings, and the ability to customize it precisely to your needs. This guide will walk you through constructing a robust, functional, and surprisingly fast wood workbench for your garage, using readily available materials and basic tools. Forget complicated joinery or expensive lumber; we’re focusing on a simple design you can complete quickly, transforming your workspace in no time.
Why a DIY Wood Workbench is Essential for Your Garage
A well-built workbench significantly enhances your productivity and safety in the garage. It provides a stable, dedicated surface that prevents tools and materials from shifting, which is crucial for precision work and reducing the risk of accidents. Beyond safety, a workbench brings order to chaos, giving you a central hub for all your projects and keeping your tools organized. Instead of bending over makeshift surfaces or working on the floor, you’ll have an ergonomic setup that makes hours of work more comfortable and efficient.
Choosing the DIY route for your workbench is a smart decision for several reasons. Firstly, it’s remarkably cost-effective. Store-bought workbenches, especially sturdy ones, can be quite expensive. By building your own, you save a significant amount on labor and can select materials that fit your budget without compromising quality. Secondly, DIY allows for complete customization. You dictate the dimensions, materials, and features, ensuring the bench perfectly suits your space and specific projects. Finally, and perhaps most importantly, building it yourself is an excellent learning experience, boosting your confidence and woodworking skills. Our approach emphasizes speed and simplicity, using common construction lumber and straightforward assembly methods so you can get to work on your projects faster.
Planning Your Fast DIY Workbench: Key Considerations
Before you even pick up a saw, a little planning goes a long way to ensure your workbench meets your needs and fits your garage perfectly. Thinking through these key aspects will streamline your build process and result in a workbench you’ll love for years.
Determine Your Needs and Space
The first step is to consider how you’ll primarily use your workbench and the available space in your garage. Will it be for heavy-duty woodworking, delicate crafts, or general repairs? This helps determine the ideal size and required sturdiness. Measure your available area carefully, ensuring there’s enough room not only for the bench itself but also for you to move around it and work comfortably. Common workbench dimensions range significantly, but a good starting point for a versatile garage bench is approximately 30 inches deep, 60-72 inches wide, and 34-38 inches tall, aligning roughly with your waist for comfortable standing work. Decide if you need a stationary bench anchored to a wall or a mobile one with casters that can be moved and stored out of the way. For a “fast” build, a simple, sturdy, stationary design is often quickest to construct, though adding casters is a popular optional upgrade.
Material Selection for Speed and Sturdiness
|
Our Picks for the Best Work Bench in 2026
As an Amazon Associate I earn from qualifying purchases.
|
||
| Num | Product | Action |
|---|---|---|
| 1 | Seville Classics UltraHD 72" W X 25" D Wood Top Height Adjustable Workbench 2000 Lb Capacity |

|
| 2 | Express Folding Worktable, Easy Setup Portable Folding Workbench, 34" W x 24" D Lightweight Versatile Worktable with 1650 Lbs Load Capacity Work Benches for DIY Home Improvements Professional Worksite |
|
| 3 | POWERTEC Portable Small Workbench with Vise, Imprinted Ruler and Protractor Scale, Folding Sawhorse/Worktable and 4 Bench Dogs for Woodworking Projects (MT4006V) |
|
| 4 | Express Folding Work Table, Easy Setup Portable Folding Work Table & Portable Folding Workbench, 34" W x 25" D x 31" H Lightweight Versatile Clamping Worktable for Garage/Wood Shop (Black) |
|
| 5 | Heavy Duty Workbench Bracket Kit - 8 Pcs Steel 3-Way Right Angle Corner Brackets for DIY Custom Workbench, Shelving, Work Table, Fits 2x4 (Actual 1.5"x3.5") Wood |
|
| 6 | Keter Folding Work Table, Portable Workbench w/ 12" Clamps for Garage/Wood Shop - Heavy-Duty and All-Weather for DIY Home Improvements and Worksites |
|
| 7 | Foldable Work Bench,Easy Step Protable Work Table,34" W x 25" D x 31" H Lightweight Workbench wih 1650 LBS,Work Benches for Garage,Work Bench Suitable for Garage,Workshop and Home (Green) |
|
| 8 | Heavyweight 2' x 4' DIY Workbench Kit with Heavy-Duty Plastic Brackets, Easy-Cut Build, Lumber Not Included, Gray |
|
| 9 | BORA Centipede 30in Folding Work Table - 48 x 96 Portable Workbench with 6000lb Capacity, 15-Strut Collapsible Work Bench for Garage, Mobile Workstation with Storage Bag - No Assembly Required CK15S |
|
| 10 | Bench Solutions Heavy Duty Fold Down Work Bench. |
|
For a fast and sturdy DIY workbench, choosing the right materials is paramount. The goal is readily available, affordable, and easy-to-work-with lumber. The backbone of most quick DIY workbenches is 2×4 dimensional lumber. These are inexpensive, strong enough for most garage tasks, and can be found at any hardware store. For the workbench top and a potential lower shelf, plywood or MDF (medium-density fiberboard) are excellent choices. Plywood, typically 1/2-inch or 3/4-inch thick, is durable, dimensionally stable, and comes in large sheets that can be cut to size. MDF offers a very smooth, flat surface but can be heavier and less resistant to moisture than plywood. When selecting wood, look for straight pieces with minimal knots or warps to ensure a flat work surface and stable structure. Avoid pressure-treated lumber, as it’s intended for outdoor use and can off-gas chemicals indoors. For fasteners, 2 1/2-inch or 3-inch wood screws are ideal for robust butt joints, offering strong connections without complex joinery.
Essential Tools for a Quick Build
One of the great advantages of building a fast DIY workbench is that you don’t need a professional workshop full of specialized tools. A basic set of power and hand tools will get the job done efficiently.
- Cutting: A circular saw is the workhorse for cutting lumber and sheet goods. If you have access to a miter saw, it will make precise crosscuts even easier.
- Drilling & Fastening: A cordless drill or impact driver is essential for pre-drilling holes and driving screws quickly.
- Measuring & Marking: A tape measure, a carpenter’s square (or speed square), and a pencil are fundamental for accurate measurements and layout.
- Safety: Always wear safety glasses and hearing protection when operating power tools.
- Optional but helpful: Clamps can hold pieces steady during assembly, and a sander can smooth rough edges.
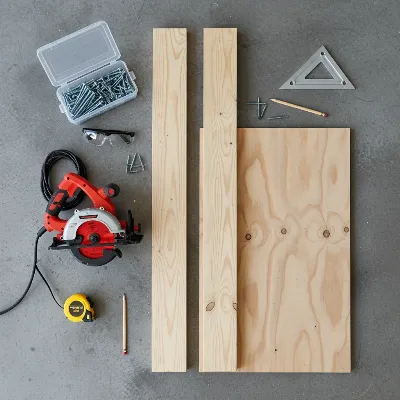 Essential tools and materials for building a DIY wood workbench in a garage.
Step-by-Step Guide to Building Your Workbench Fast
Building a sturdy wood workbench for your garage doesn’t have to be an all-weekend affair. With careful planning and straightforward construction techniques, you can have a functional workspace ready for action in just a few hours. This guide focuses on a simple, robust design ideal for beginners.
Gather Your Materials and Tools
Having all your materials and tools ready before you start cutting and assembling will significantly speed up the process. For a standard 60-inch wide, 30-inch deep, and 34-inch tall workbench with a lower shelf, here’s a common list:
Materials:
- 2x4s: Approximately eight 8-foot-long 2x4s (select straight pieces of pine or fir).
- Plywood: One 4×8 foot sheet of 3/4-inch plywood (for the top and shelf).
- Wood Screws: A box of 2 1/2-inch or 3-inch wood screws.
Tools:
- Circular saw (or miter saw)
- Cordless drill/impact driver with drill bits (for pilot holes) and a driver bit
- Tape measure
- Speed square or combination square
- Pencil
- Safety glasses and hearing protection
- Clamps (optional, but highly recommended)
Make Your Cuts
Accuracy in your cuts is vital for a sturdy and square workbench. Take your time, measure twice, and cut once.
- From 2x4s:
- Legs: Four pieces at 32.5 inches (this gives you a 34-inch total height with a 1.5-inch thick plywood top).
- Long Frame Rails (Top & Bottom): Four pieces at 57 inches.
- Short Frame Rails (Top & Bottom): Four pieces at 27 inches.
- (Note: These dimensions assume butt joints where short rails fit between long rails).
- From 3/4-inch Plywood:
- Workbench Top: One piece at 60 inches x 30 inches.
- Lower Shelf: One piece at 57 inches x 27 inches.
When using a circular saw, clamp a straightedge to your plywood or lumber to guide your saw for perfectly straight cuts. Ensure your blade depth is set correctly, just deep enough to cut through the material to minimize tear-out.
Assemble the Workbench Frames
You’ll construct two identical rectangular frames: one for the top and one for the lower shelf.
- Lay out: Place two 57-inch 2x4s parallel on your work surface.
- Attach short rails: Insert two 27-inch 2x4s between the long rails at each end, flush with the ends. This forms a rectangle.
- Secure with screws: Pre-drill pilot holes to prevent wood splitting, then drive 2 1/2-inch or 3-inch wood screws through the long rails into the ends of the short rails. Use at least two screws per joint.
- Repeat: Build a second identical frame for the lower shelf.
Attach the Legs
Now, connect your two frames with the legs.
- Position legs: Stand one frame on its edge. Position a 32.5-inch leg flush into each corner of the frame.
- Secure top frame: Pre-drill and drive screws from the outside of the frame rails into the legs, using two or three screws per leg at the top.
- Attach bottom frame: Measure up from the bottom of each leg (e.g., 10-12 inches) and mark the position for your lower shelf frame. This provides a spacious storage area.
- Secure lower frame: Place the second frame at these marks, ensuring it’s level and square. Pre-drill and drive screws through the lower frame rails into the legs, again using two or three screws per joint.
- Repeat for all legs: Once all four legs are attached to both the top and bottom frames, the main structure of your workbench is complete.
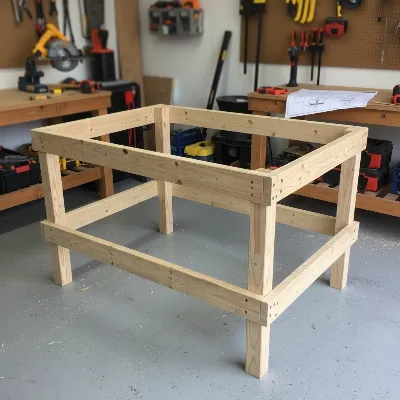 Partially assembled wooden workbench frame showing legs and support rails.
Install the Workbench Top and Lower Shelf
With the frame assembled, it’s time to add the working surfaces.
- Workbench Top: Place the 60×30-inch plywood piece on top of the upper frame. Align it so there’s a consistent overhang on all sides (1.5 inches for these dimensions). This overhang is useful for clamping.
- Secure Top: Pre-drill pilot holes through the plywood into the 2×4 frame underneath, then drive wood screws (e.g., 1 5/8-inch or 2-inch screws work well here) every 8-12 inches around the perimeter and along any interior support rails.
- Lower Shelf: Place the 57×27-inch plywood piece onto the lower frame. It should fit snugly inside the frame you built.
- Secure Shelf: Screw the lower shelf down to the 2×4 frame using screws, ensuring it’s firmly attached for stable storage.
Quick Tips for a Durable and Functional Workbench
To ensure your workbench is not only built fast but also lasts long and serves you well, consider these simple enhancements:
- Pre-drilling is key: Always pre-drill pilot holes slightly smaller than your screws, especially when screwing near the ends of boards. This prevents wood splitting, a common issue in quick builds, and ensures stronger joints.
- Check for squareness: Throughout the assembly, use your speed square to check that all corners are square (90 degrees). A square workbench is a stable workbench. Minor adjustments during assembly are much easier than fixing a crooked bench later.
- Consider casters for mobility: If you need to move your workbench around the garage, invest in a good set of locking swivel casters. Bolt them securely to the bottom of the legs. to account for their height in your initial leg cuts to maintain your desired working height.
- Edge protection: While building fast often means foregoing elaborate finishes, you can protect the plywood edges from chipping by applying a thin strip of wood or iron-on veneer.
- Add a simple finish: A coat or two of polyurethane or a sturdy paint can protect your workbench surfaces from spills, stains, and general wear and tear, extending its lifespan.
- Integrate power: For ultimate convenience, mount a power strip directly to one of the workbench legs or the side frame. This eliminates tangled extension cords and keeps power readily accessible for your tools.
> “The best workbench is the one you actually build. Don’t let perfection be the enemy of progress; a simple, sturdy DIY bench is a major upgrade for any home project.” – John Doe, Master Carpenter & DIY Educator
Conclusion
Building your own DIY wood workbench for the garage doesn’t require a master craftsman or an unlimited budget. By focusing on simple design, readily available materials like 2x4s and plywood, and efficient assembly techniques, you can construct a sturdy and functional workspace quickly. This project is not just about creating a surface to work on; it’s about reclaiming your garage, enhancing your productivity, and gaining valuable hands-on experience. With a few hours of dedicated effort, you can transform a chaotic corner into an organized hub for all your future projects. So, grab your tools, embrace the satisfaction of building something with your own hands, and get ready to tackle those long-awaited DIY tasks. What will be the first project you complete on your new, custom-built workbench?
Frequently Asked Questions
How long does it take to build a DIY wood workbench?
Many simple DIY wood workbench designs can be built in a single afternoon or over a weekend, especially if you have all your materials and tools ready. Focusing on butt joints and screws significantly speeds up the construction process, making it a fast project for beginners.
What is the cheapest wood to use for a workbench?
For a budget-friendly DIY workbench, common construction lumber such as pine or fir 2x4s are typically the cheapest and most readily available options. For the top and shelves, plywood or MDF offer economical and practical surfaces.
What height should a workbench be?
The ideal workbench height depends on your individual stature and the type of work you’ll be doing. A common ergonomic guideline suggests a height around your waist or slightly below, typically between 34 to 38 inches, to reduce strain when working while standing.
Can I add storage to this simple workbench later?
Absolutely! This simple workbench design provides a sturdy foundation that can easily be customized with additional storage later. You can add more shelves, pegboard backing, or even build simple drawers underneath the top surface as your needs evolve.
