A robust wood workbench is the cornerstone of any productive workshop, but its true potential is unlocked with the right accessories. Among the most indispensable additions is a reliable workbench vise, often colloquially referred to as “vise grips” for its powerful holding capabilities. Installing a vise is a transformative DIY project that significantly enhances your workbench’s versatility, safety, and efficiency. Whether you’re a seasoned woodworker or just starting, a properly mounted vise provides the extra set of hands you constantly wish for, securely holding materials for cutting, shaping, sanding, or assembly. This comprehensive guide, informed by over a decade of hands-on experience, will walk you through every step of seamlessly integrating a robust woodworking vise into your new wood workbench, turning it into a truly professional-grade workstation.
Understanding Your Workbench Vise: The Foundation for DIY Success
A workbench vise is far more than a simple clamping device; it’s a dedicated work-holding system designed to secure materials firmly to your bench, freeing your hands for precision tasks. In woodworking, these vises are crucial for stability, preventing workpieces from shifting, vibrating, or rotating during operations that require both hands, such as chiseling, sawing, routing, or planing. The enhanced stability directly translates to increased accuracy, improved safety by minimizing slip hazards, and greater overall efficiency in your projects.
While various vises exist, for a wood workbench, the focus is typically on woodworking vises, which come in common types like quick-release, front vises, and end vises. A quick-release vise offers the convenience of rapidly adjusting jaw spacing with a simple lever, ideal for frequent changes in workpiece size. Front vises are mounted to the front edge of the bench, making them versatile for clamping boards horizontally or vertically. End vises, often integrated into the benchtop itself, are excellent for securing longer boards along the bench surface, often in conjunction with bench dog holes. Each type serves a unique purpose, but the core benefit of unwavering grip remains constant.
At its heart, a woodworking vise consists of several key components: the rear jaw (fixed to the bench), the front jaw (movable), a screw mechanism (to apply clamping force), and guide rods (to ensure smooth, parallel movement). Understanding these parts is the first step to a successful installation. When selecting a vise, consider its jaw width, opening capacity, and overall construction material (cast iron for durability). A larger vise generally offers more clamping power and versatility, but ensure it’s proportional to your workbench size and intended use.
Essential Tools and Materials for Vise Installation
Before you begin the installation process, gather all the necessary tools and materials. Having everything at hand will ensure a smooth and efficient workflow, minimizing interruptions.
Tools You Will Need:
- Drill: A corded or powerful cordless drill for boring pilot holes and securing fasteners.
- Drill Bits: A set of wood drill bits, including brad-point bits for clean holes and a countersink bit if using carriage bolts.
- Saws: A hand saw (backsaw or Japanese pull saw) for precise cuts, and possibly a circular saw or miter saw for cutting spacer blocks and wooden jaws.
- Measuring Tools: Tape measure, ruler, and a reliable square (e.g., combination square) for accurate marking and layout.
- Marking Tools: Pencil for precise marking.
- Clamps: A variety of clamps (F-clamps, C-clamps) to temporarily hold the vise and wooden jaws in place during marking and assembly.
- Wrenches/Socket Set: For tightening lag screws, nuts, and bolts.
- Chisel & Mallet (Optional): If you opt for a flush-mount installation requiring mortising.
- Safety Gear: Safety glasses and hearing protection are always recommended.
Materials You Will Need:
- Workbench Vise: Your chosen woodworking vise.
- Hardwood for Spacer Blocks: Blocks of dense wood (e.g., oak, maple) to create a flush surface for the vise jaws.
- Hardwood for Wooden Jaw Liners (Cheeks): Protects your workpieces and adds grip. Maple or birch plywood are good choices.
- Mounting Hardware:
- Lag Screws with Washers: For thicker benchtops (2 inches or more).
- Carriage Bolts with Washers and Nuts: For thinner benchtops (less than 2 inches), requiring through-drilling.
- Wood Glue: For attaching spacer blocks and wooden jaws (if not screwing directly).
- Sandpaper: For smoothing edges of wooden jaws.
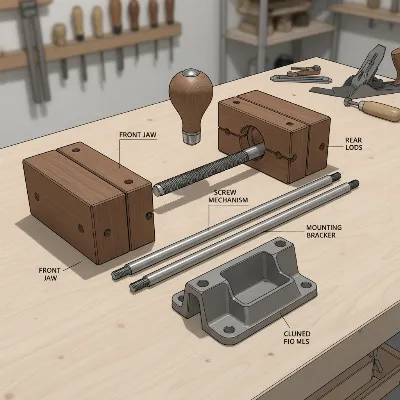 Workbench vise components and parts for installation
Step-by-Step Guide: Installing Your Workbench Vise
Installing a workbench vise is a rewarding DIY project that significantly upgrades your workspace. Follow these steps carefully for a secure and functional installation.
Planning Your Vise Placement
|
Our Picks for the Best Work Bench in 2026
As an Amazon Associate I earn from qualifying purchases.
|
||
| Num | Product | Action |
|---|---|---|
| 1 | Heavyweight 2' x 4' DIY Workbench Kit with Heavy-Duty Plastic Brackets, Easy-Cut Build, Lumber Not Included, Gray |

|
| 2 | Foldable Work Bench,Easy Step Protable Work Table,34" W x 25" D x 31" H Lightweight Workbench wih 1650 LBS,Work Benches for Garage,Work Bench Suitable for Garage,Workshop and Home (Green) |
|
| 3 | Bench Solutions Heavy Duty Fold Down Work Bench. |
|
| 4 | BORA Centipede 30in Folding Work Table - 48 x 96 Portable Workbench with 6000lb Capacity, 15-Strut Collapsible Work Bench for Garage, Mobile Workstation with Storage Bag - No Assembly Required CK15S |
|
| 5 | Express Folding Work Table, Easy Setup Portable Folding Work Table & Portable Folding Workbench, 34" W x 25" D x 31" H Lightweight Versatile Clamping Worktable for Garage/Wood Shop (Black) |
|
| 6 | Seville Classics UltraHD 72" W X 25" D Wood Top Height Adjustable Workbench 2000 Lb Capacity |
|
| 7 | Heavy Duty Workbench Bracket Kit - 8 Pcs Steel 3-Way Right Angle Corner Brackets for DIY Custom Workbench, Shelving, Work Table, Fits 2x4 (Actual 1.5"x3.5") Wood |
|
| 8 | Keter Folding Work Table, Portable Workbench w/ 12" Clamps for Garage/Wood Shop - Heavy-Duty and All-Weather for DIY Home Improvements and Worksites |
|
| 9 | Express Folding Worktable, Easy Setup Portable Folding Workbench, 34" W x 24" D Lightweight Versatile Worktable with 1650 Lbs Load Capacity Work Benches for DIY Home Improvements Professional Worksite |
|
| 10 | POWERTEC Portable Small Workbench with Vise, Imprinted Ruler and Protractor Scale, Folding Sawhorse/Worktable and 4 Bench Dogs for Woodworking Projects (MT4006V) |
|
Strategic placement is key to maximizing your vise’s utility. For most right-handed users, the ideal locations are either towards the left of the front edge of your bench or at the right end. Left-handed users might prefer the opposite. Consider how you typically work and what types of projects you undertake. An end position is excellent for clamping wider, flatter pieces like doors or large panels, especially if your vise has an integrated dog that pairs with benchtop dog holes for extended clamping. For general-purpose work, the front edge is often the most versatile.
Crucially, ensure the vise, once installed, does not interfere with the bench’s legs, aprons, or any other structural elements. Also, account for the thickness of the wooden jaw liners (or “cheeks”) you will add; most woodworkers prefer these liners to be flush with the workbench corner or edge for a seamless work surface. Many vises are designed so that their cast iron jaws sit approximately 1/2 inch below the bench’s top surface. This intentional recess protects your tools from accidental contact with the metal jaws during planing or sanding operations.
Preparing the Vise and Workbench
Begin by partially disassembling your vise. Remove the front jaw, the main screw mechanism, and the guide rods. This makes the heavy rear jaw much easier to handle and position during installation. Next, you’ll need to determine the thickness of any spacer blocks required. These blocks fill the gap between the vise’s carriage (the part that mounts to the bench) and the underside of your workbench, ensuring the vise jaws align correctly with your benchtop. Place the rear jaw upside down on your bench, then measure the distance between the top of its mounting bracket and the underside of your bench where it will be installed. Cut hardwood spacer blocks to this precise thickness and to a size that fully supports the vise’s mounting plate.
Depending on your preference, you might choose between a standard surface mount with spacer blocks or a flush-mount method. For a flush mount, you will mortise the rear jaw into the edge of your benchtop, creating a recess for a seamless fit. This involves marking the outline of the rear jaw on the bench edge, then using a router or chisels to carefully remove material to the depth of the jaw’s thickness. This advanced method provides a cleaner look and allows the vise face to be perfectly integrated with the bench.
Marking and Drilling Mounting Holes
With the rear jaw and spacer blocks in place (or the mortise cut), temporarily clamp the vise assembly to your chosen location on the workbench. Use a pencil to carefully mark the exact positions for the mounting holes. Precision here is paramount for a sturdy installation. Remove the vise and use a drill to bore pilot holes at these marked locations. The size of your pilot bit should be slightly smaller than the shank of your lag screws or carriage bolts to allow the threads to bite firmly without splitting the wood. If using carriage bolts for a thinner benchtop, you’ll also need to bore counterbored holes on the top surface of your workbench so that the bolt heads sit flush or slightly below the surface, preventing them from snagging on workpieces or tools.
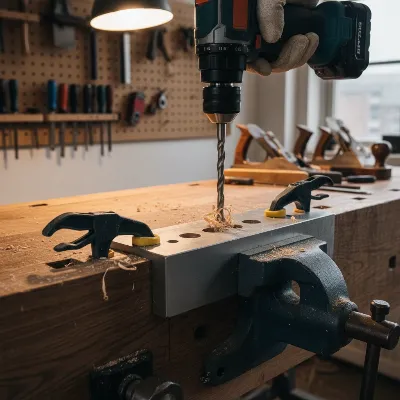 Drilling mounting holes for a workbench vise on a wooden bench
Securely Attaching the Vise Body
Once the holes are drilled, it’s time to permanently attach the rear jaw and spacer blocks to your workbench. For benchtops 2 inches thick or more, lag screws are an excellent choice. Apply a small amount of wood glue to the spacer blocks before positioning them. Then, run the lag screws with washers up from underneath the vise’s carriage, through the spacer block, and into the pilot holes in the underside of the benchtop. Tighten them securely with a wrench or socket.
If your benchtop is less than 2 inches thick, carriage bolts are a more secure option, passing all the way through the benchtop. Insert the carriage bolts from the top of the bench (through the counterbored holes), passing through the spacer blocks and the vise carriage. Secure them from underneath with washers and nuts, tightening them firmly. Ensure the bolt heads are flush or below the surface of the benchtop to avoid any obstruction.
Crafting and Installing Wooden Jaw Liners
Wooden jaw liners, often called “cheeks,” are essential additions to any woodworking vise. They protect your delicate workpieces from the hard metal of the vise jaws, provide a better grip, and can be easily replaced when worn. Cut two pieces of sturdy hardwood (like maple, ash, or birch plywood) to the exact height and width of your vise jaws. Ensure they are thick enough (typically 3/4 inch to 1 inch) to provide good cushioning and durability.
The method for attaching these liners can vary. Many woodworkers simply screw them onto the metal jaws from the front, countersinking the screw heads. Alternatively, for a cleaner look or easier replacement, you can attach the front jaw liner by screwing from behind through the metal jaw’s existing holes. For the rear jaw liner, once the vise is fully assembled, you can clamp the liner in place and drill pilot holes through the liner and into the bench or spacer block, securing it with screws. Some prefer to use strong rare-earth magnets embedded in the wooden jaws and the metal vise for tool-free attachment and removal.
> “Adding wooden jaw liners is not just about aesthetics; it’s a critical functional enhancement. They prevent marring, improve clamping force distribution, and protect your precious workpieces from damage.” – John Smith, Master Woodworker and Shop Foreman.
Final Assembly and Adjustments
With the rear jaw securely mounted and the wooden liners ready, it’s time to reassemble the rest of your vise. Slide the guide rods back into place, attach the front jaw, and reinsert the main screw mechanism. Turn the handle to ensure the jaws open and close smoothly and parallel to each other. Check for any binding or uneven movement. Apply a light lubricant (like paraffin wax or dry graphite) to the screw threads and guide rods for optimal performance. Test the vise by clamping various sizes of scrap wood. Ensure it holds firmly without slipping and that the quick-release mechanism (if present) functions flawlessly. Make any necessary fine adjustments to the wooden jaw liners to ensure they are perfectly flush with your workbench surface and each other.
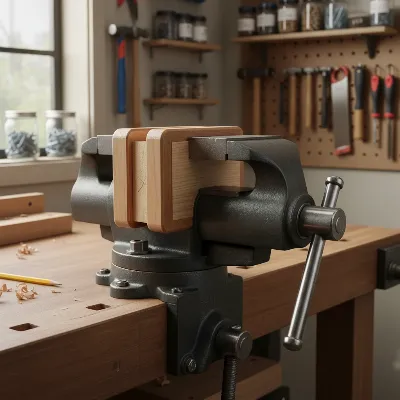 Finished wooden jaw liners attached to a workbench vise
Maximizing Your Workbench Vise’s Potential
A properly installed workbench vise is a powerful tool, but its utility can be further extended with smart usage and regular maintenance.
Tips for Optimal Use:
- Utilize Bench Dog Holes: If your workbench has dog holes, use them in conjunction with your vise for clamping wider or longer workpieces. Bench dogs, which are pegs inserted into the holes, provide additional clamping points when used with the vise’s front or end jaw.
- Protective Pads: Beyond the wooden jaws, consider using additional leather or cork pads for highly delicate work. These can be temporarily attached to the wooden jaws to prevent pressure marks.
- Even Pressure: Always apply even pressure when clamping, ensuring the workpiece is fully seated against both jaws. Avoid overtightening, which can damage both the material and the vise.
- Accessory Integration: Some vises can be fitted with special accessories like pipe jaws, expanding their capabilities for specific tasks.
Maintenance:
- Lubrication: Periodically lubricate the main screw and guide rods with a dry lubricant or paraffin wax to keep the vise operating smoothly. Avoid oily lubricants that can attract sawdust.
- Cleanliness: Keep the vise jaws and screw mechanism free of sawdust and debris. A stiff brush can be helpful.
- Check Hardware: Routinely inspect the mounting hardware (lag screws, bolts, nuts) for any looseness. Tighten them as needed to maintain a secure installation.
- Replace Wooden Jaws: Over time, the wooden jaw liners will show wear. Replace them as soon as they become grooved or damaged to maintain effective clamping and workpiece protection.
Conclusion
Adding a high-quality vise to your new wood workbench is one of the most impactful DIY upgrades you can make. It transforms your workspace from a simple surface into a dynamic, versatile, and highly efficient work-holding station. By following this detailed guide, you’ve not only mastered the technical steps of installation, from precise planning and drilling to securely attaching the vise and crafting custom wooden jaws, but also gained an understanding of how to maintain and maximize its potential. The investment of time and effort in properly adding a workbench vise will pay dividends in increased productivity, enhanced safety, and the satisfaction of tackling your woodworking projects with greater confidence and control. What challenging project will your newly equipped workbench help you conquer first?
Frequently Asked Questions
What is the ideal height for a workbench vise?
The ideal height for a workbench vise positions the top of its jaws roughly level with your workbench surface, or slightly below it (about 1/2 inch) to protect your tools. This ensures comfortable working posture and allows for seamless use of the workbench surface.
Can I install a metalworking vise on a wood workbench?
While possible, it’s generally recommended to install a woodworking vise on a wood workbench. Metalworking vises are designed for heavier impact and often have serrated jaws that can mar wood. If using a metalworking vise, ensure sturdy mounting and always use sacrificial wooden liners to protect your workpieces.
How do I choose between lag screws and carriage bolts for mounting?
The choice depends on your workbench top’s thickness. Use robust lag screws with washers for benchtops 2 inches or thicker, screwing into the underside. For benchtops thinner than 2 inches, carriage bolts that pass completely through the benchtop with nuts and washers underneath provide superior holding power and prevent pull-out.
What wood is best for workbench vise jaw liners?
Dense hardwoods like maple, oak, ash, or even high-quality birch plywood are excellent choices for workbench vise jaw liners. They are durable, resist denting, and provide good friction for holding workpieces securely without leaving marks.
How often should I lubricate my workbench vise?
The frequency of lubrication depends on usage, but a good rule of thumb is to apply a dry lubricant (like paraffin wax or graphite) to the screw threads and guide rods every few months, or whenever you notice the vise mechanism feeling stiff or less smooth. Avoid wet lubricants that attract sawdust.
